Gallows lamp
3 pieces of wood and 4 dowels were used in this project. The length of the arm was approximately half of the dining table, so the light could spread evenly throughout the top. I started by cutting the tenon on my table saw and then shaping the other end of that arm.


To minimize any tear-out I drilled the hole before proceeding to my sanding station. I wasn’t sure what bulb holder would be installed (plastic or metal) so I used for this project a 3-core cable, just in case.

Sanding took a while. I used more aggressive belts first and the fine ones next. It is a very good idea to clean the belts with synthetic wine cork.

To get the job done I had to use my oscillating tool, little rasps, chisels and sanding by hand.

Using my router I cut the groove for the cable. Different rotary rasps were used for each side of the hole.


Once I had it done I cut the other arm to length and using my router I prepared the mortise. I also used chisels and – I must admit – an oscillating tool.


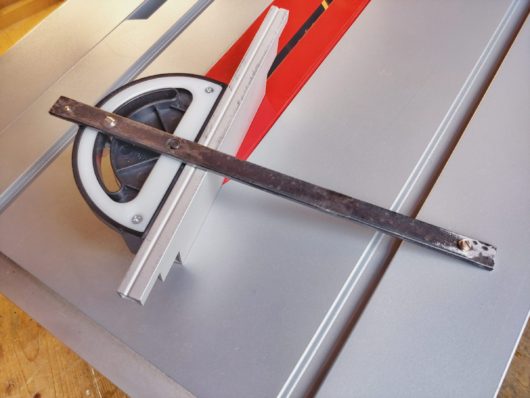
Next, I cut the supporting arm at a 45° angle using my cross-cut sledge and my speed square. I had to use some scrap plywood to support the off-cuts. Once that was done I drilled holes for the concrete screws. I used a Forster bit and an HSS one, in that order, to complete the task. Routing the cable groove was followed by routing the top and the bottom ends.


The diagonal piece had to be planed down to the right width first. I used my hand planer to remove a couple of millimetres of material.

The shape of that piece I had in mind. I used washers, flexible MDF and a scrap toilet seat to draw the lines.


I removed the bulk of the material with my jigsaw. I stayed off the line about 4 mm as the blade tends to bend. Sanding was next, it took ages and produced tons of dust – nothing I would mind though.


I drilled 10 mm holes for the dowels. I used my dowel centres to mark the exact positions. Light sanding with my orbital sander using 120 and 240 grits. Then was the dry fitting …


… and the glue-up. With some clamps, wedges and a mallet, I had it done.


Once it was dried I broke all the edges with fine sandpaper, just a tiny bit to help the varnish flow over and bond well. I drilled holes in the wall and tried if the arm was levelled.


I applied varnish and installed the plug and the switch. A 3-core cable could be used as the switch had 3 circuits.


2 coats of varnish dried for a couple of days, and the finish was smoothed out with some steel wool and wax. Right after that, I installed the cable. To avoid any dents I covered the workbench with some cloths.


Using my socket spanner I attached it to the wall. Then was time to install the lamp holder, which was only suitable for a 2-core cable, too bad.


I got the right height (length) of the cable straight away. There was enough light for the table, and it wasn’t blinding either. An adult man sitting at the table will never be blind and get their meal properly lighted. Very happy with how this project came out!